


A Comprehensive Guide to Creating Your Own Slack App.
March 29, 2023
Slack is a widely used messaging platform that enables teams to communicate and collaborate in real-time. Slack's functionality can be extended with custom apps, which can automate tasks, integrate with other tools, and enhance productivity. This beginner's guide will walk you through the process of creating your own Slack app, step by step.
Create a Slack workspace: Before you can develop a Slack app, you must first make a Slack workspace. If you don't already have one, you can make one for free on the Slack website.
Step 1: Create a Slack App
To begin building, the first step is to create a new Slack app. To do this, you'll need to log in to your Slack account and go to the Slack API website. Once you're there, click on the "Create an App" button to begin. Then follow the below steps:
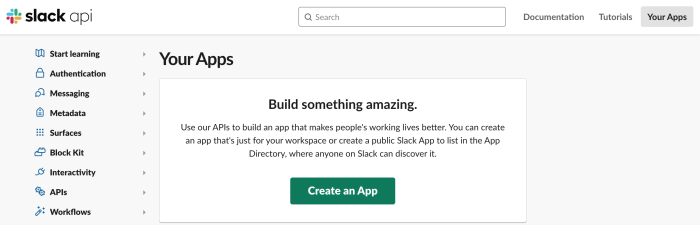
You've got a couple of options to get started. The first option is to start from scratch using our configuration UI. With this method, you can manually add all the necessary information, scopes, settings, and features to your app. Alternatively, you can create your new app using an app manifest (BETA). This option involves using a manifest file to define your app's basic information, scopes, settings, and features. For the purpose of this tutorial, we'll be showing you how to create your new app from scratch using the configuration UI.

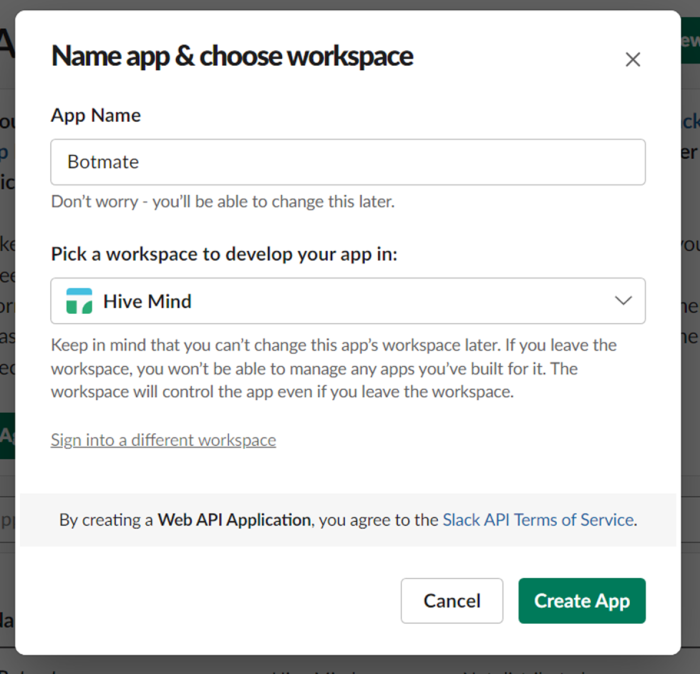
Choose a name for your app.
Select the workspace where you want to install it.
Choose a custom icon and description for your app

Step 2: Configure Your Slack App
Great job, you've created your Slack app! Now it's time to configure it and make it work just the way you want. This involves setting up various parameters, like permissions, event subscriptions, and command settings. These settings will determine how your app behaves and what it can do on Slack. Here's what we'll be working on:
Configure the OAuth & Permissions settings:
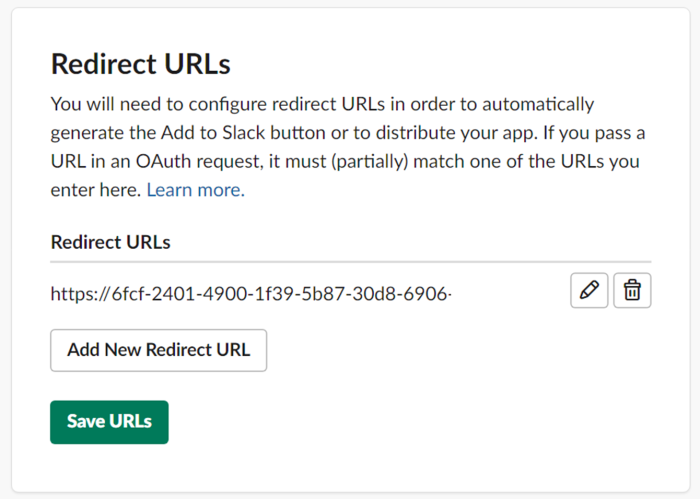
Here, you'll need to specify the scopes your app requires. Scopes are like permissions that determine the actions your app can take. For instance, if your app needs to send messages to channels, it needs the chat:write scope. Next, you'll need to specify the Redirect URL. This is the URL where Slack will send the OAuth token once the user authorizes your app. You can use any URL for development purposes, but for production, it should be a secure URL.
Adding oAuth redirect URL for local development
When creating a Slack app, one of the steps is to set up the app's OAuth redirect URL. This is the URL where Slack will redirect users after they authorize your app to access their Slack workspace.
One way to set up this redirect URL is to use a tool called ngrok. Ngrok creates a secure tunnel between your local machine and the internet, allowing external services (like Slack) to connect to your app while it's still running on your local machine.
Here are the steps you can follow to set it up:
Download and install ngrok on your machine.
Open your terminal or command prompt and navigate to the directory where ngrok is installed.
Run the following command: ./ngrok http 3000 (if you're a Windows user, use ngrok.exe instead of ./ngrok).
Once the ngrok server is up and running, it will generate a public URL (e.g., https://abcdefg1234.ngrok.io) that you can use as your app's OAuth redirect URL.
Use the generated URL as your app's OAuth redirect URL in your Slack app's settings.
You can now test your app locally and any authorization requests from Slack will be redirected to your local machine.
It's important to keep in mind that the URL generated by ngrok is only valid for as long as the ngrok session is running. If you stop and start the ngrok server again, a new URL will be generated. So, it's essential to update your Slack app's OAuth redirect URL whenever you start a new ngrok session.
For instance, your redirect URL could be something like https://a66e-2401-4900-1c5c-d73-98d6-8a8a-2aa1-2fb8.in.ngrok.io/slack/oauth_redirect.
We'll be using the Bolt framework to build our app. Bolt for JavaScript by default provides a Redirect URI Path /slack/oauth_redirect, which is used by Slack to redirect users after they complete an app's installation flow.
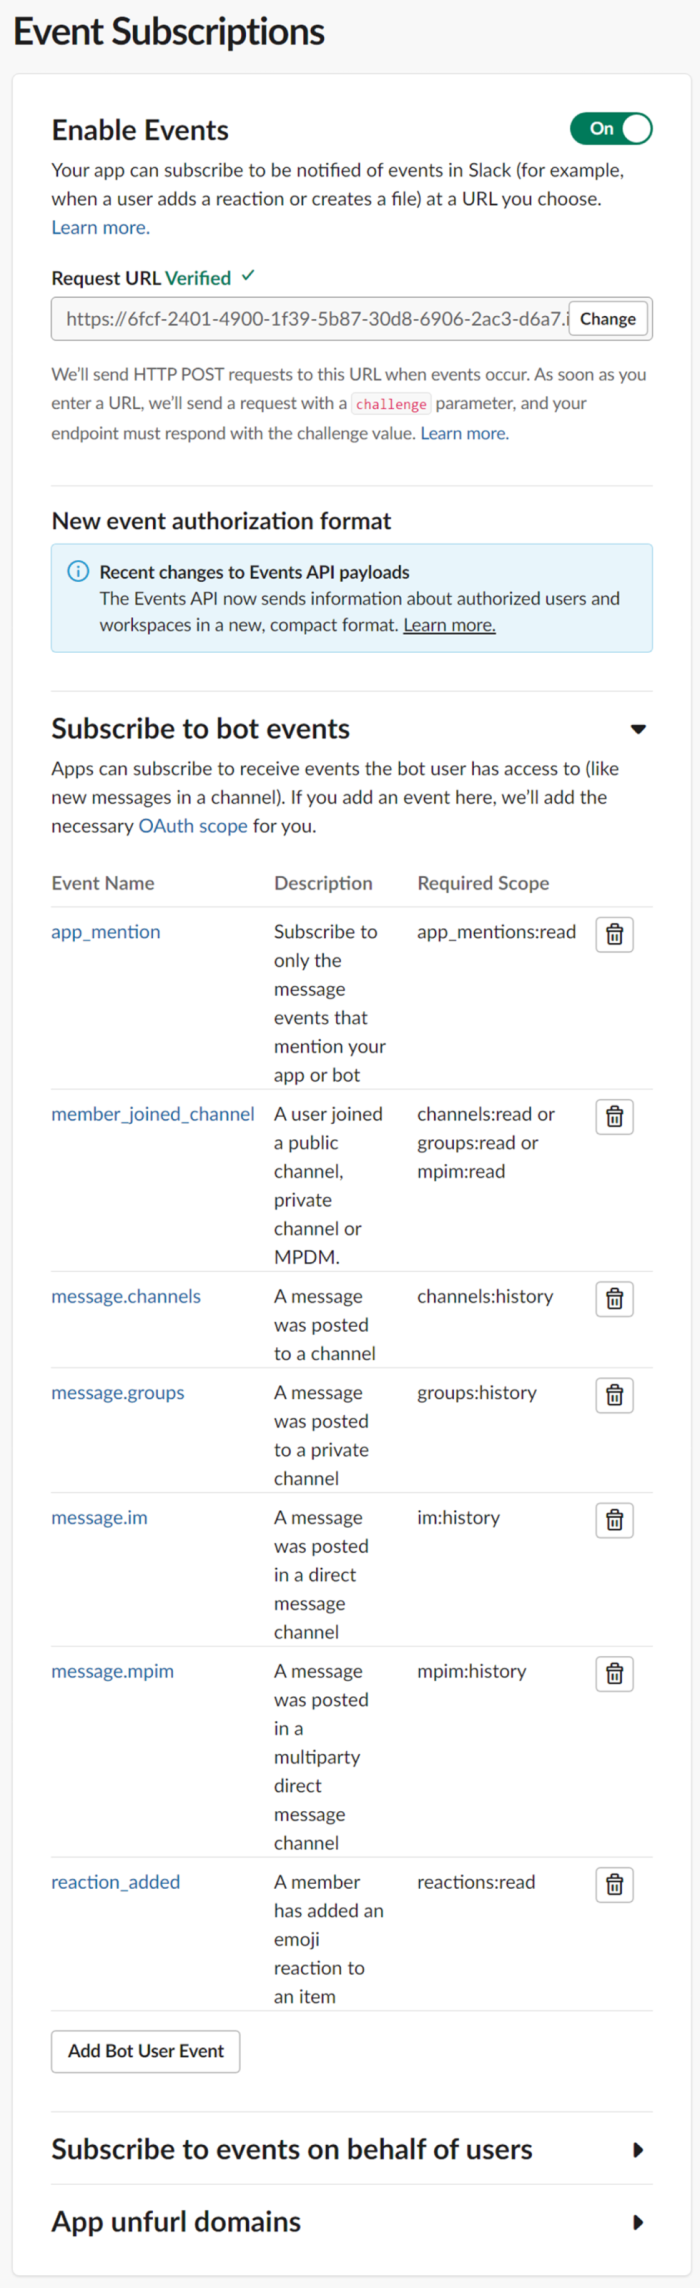
Event Subscriptions settings:
In this section, you'll need to specify the events your app is interested in. For example, if your app needs to respond to messages, you'll need to subscribe to the www.message.im and message.channels events. When an event occurs, Slack will send a POST request to the URL you specify in the Request URL field. Your app should respond to this request with a 200 OK status code and an empty body. If your app fails to respond, Slack will retry sending the request a few times before giving up.
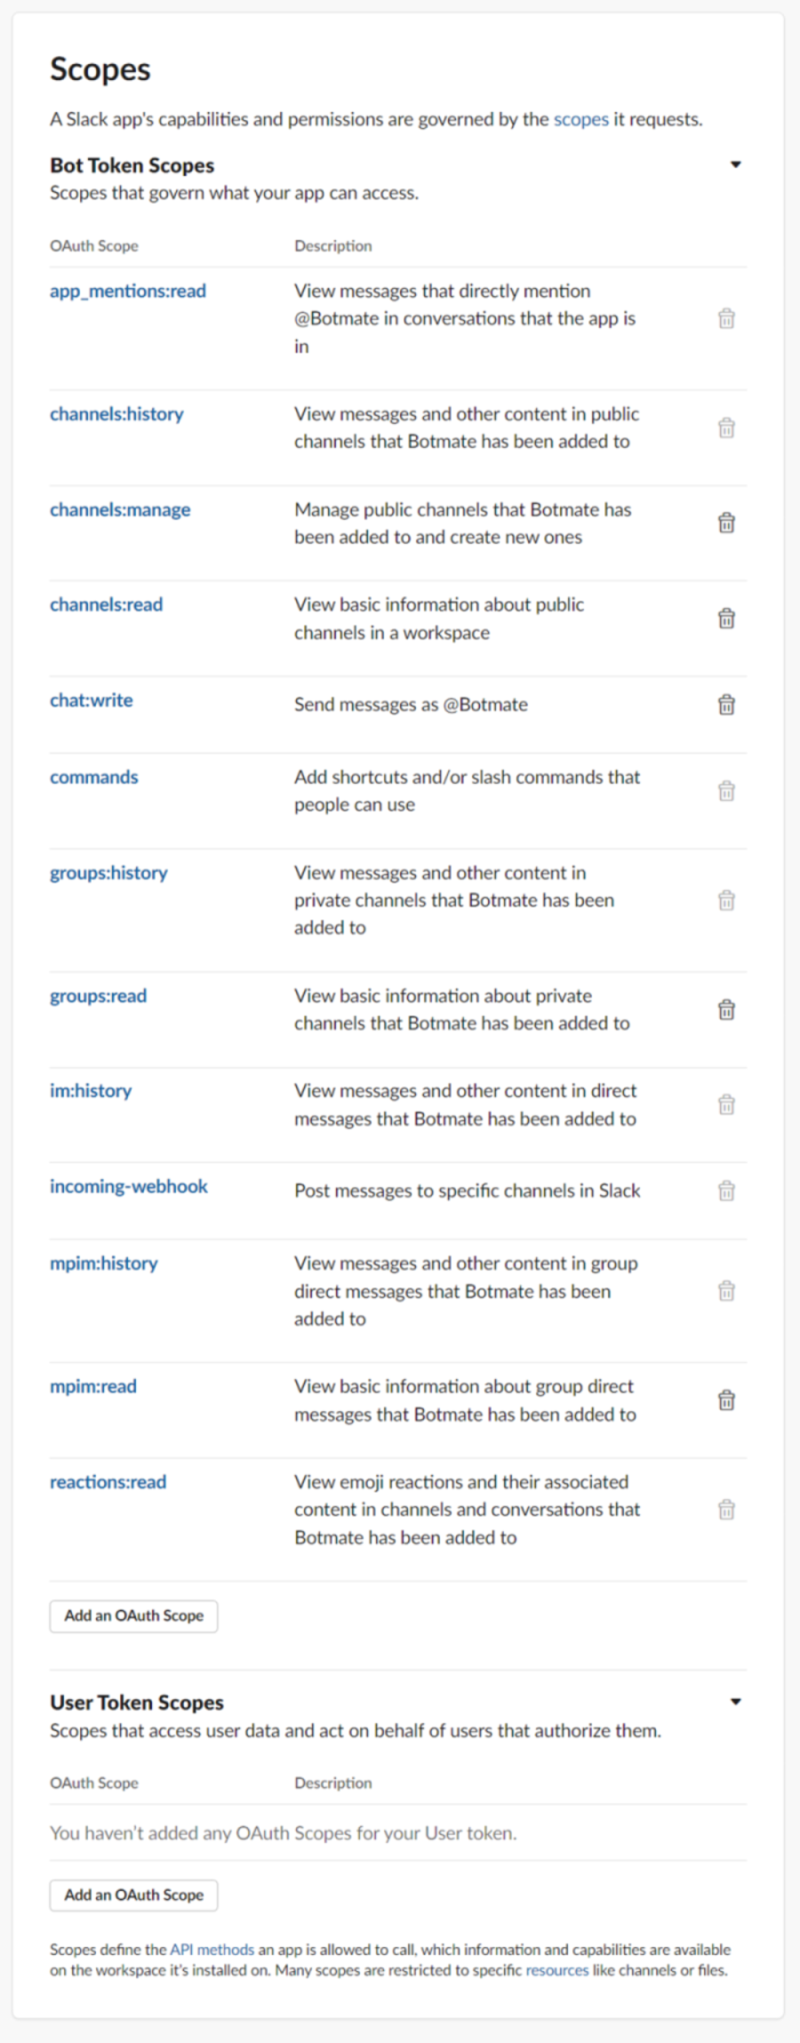
Adding scopes and events to our app
Instead of combing through the entire list of scopes available, we can take a closer look at what our app does and build out our scope list as we go.
First, let's consider what happens when a user joins our newly created channel. Our app sends them a direct message, which requires us to listen for the member_joined_channel event. To make this work, we'll need to add channels:read and groups:read scopes to our app's configuration. And to send the direct message itself, we'll need the chat:write scope.
Next, our app needs to listen and respond to messages containing certain keywords, like "hello" and "knock knock". To do this, we'll need to set up four events related to messages: message.channels, message.groups, message.im, and message.mpim. Each of these events requires its own scope, including channels:history, groups:history, im:history, and mpim:history.
Finally, our app responds with a date picker when a user reacts to a message with a :calendar: reaction. To make this happen, we'll need to add the reactions:read scope to our app's configuration and listen for the associated event, "reaction_added".
By setting up these scopes and events, we can ensure that our Slack app is able to do everything we need it to do, without requiring unnecessary permissions.
When building a Slack app using the Bolt framework, it's important to know that the default path for listening to events is /slack/events. This path is where event listeners are registered to capture a range of events like messages, reactions, and app installations that happen in a Slack workspace. So when subscribing to events API, commands, and actions, it's essential to add this endpoint. For example, if you're using a URL like: https://a66e-2401-4900-1c5c-d73-98d6-8a8a-2aa1-2fb8.in.ngrok.io/slack/events You would use this endpoint to listen to events in your Slack app.
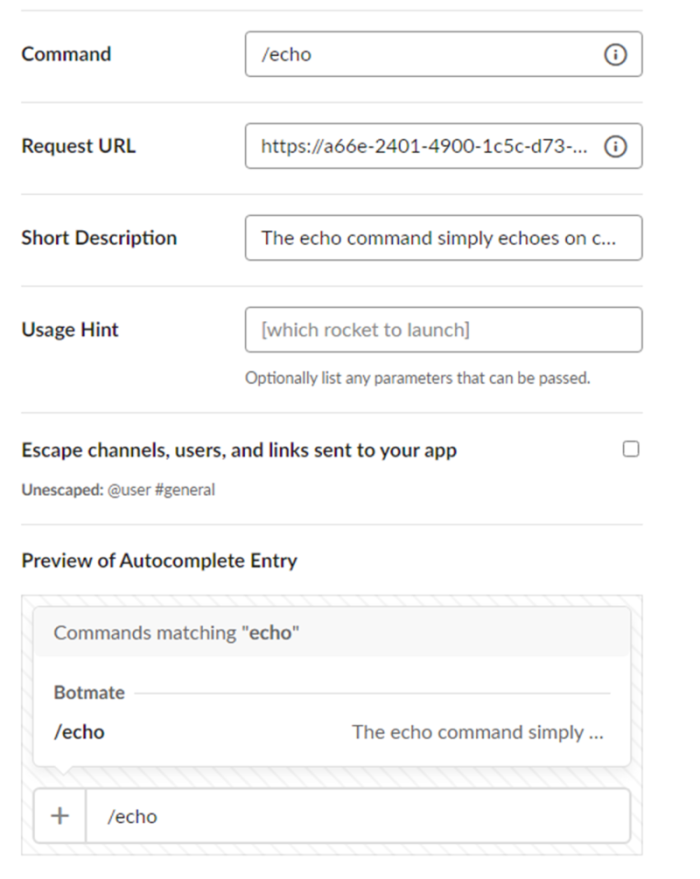
Adding slash command to our app
Slash commands are a powerful feature of Slack apps that allow users to trigger specific actions by typing a message starting with a forward slash (/). These commands can be used to perform tasks or retrieve information quickly and easily. If you're using the Bolt framework to build your Slack app, the default URL path for slash commands is /slack/events. This means that when a user types a slash command, Slack will send a request to this URL, where your app can handle the command and respond accordingly.
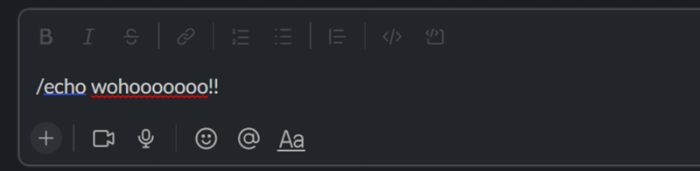
Our app includes an echo slash command. When a user types "/echo Hello, world!" in a Slack channel, the message will be sent to the /slack/events URL for our app to handle. Our app can then parse the message, extract the text "Hello, world!", and send a response back to the channel with the same message, like "You said: Hello, world!".
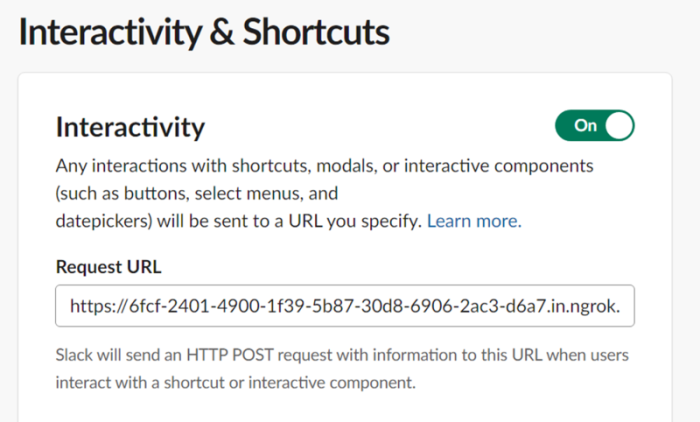
Interactivity and shortcuts are two features that make Slack apps more interactive and user-friendly. With interactivity, users can interact with the app's message payloads and views, while shortcuts provide quick access to the app's functionality through keyboard commands.
In our Slack app, we use buttons for interactivity, so we need to configure interactivity for our app. The default request URL for the Bolt framework remains the same.
Step 3: Develop Your Slack App
With the app and its settings configured, you can start developing your app. You'll need to write code to handle events, interact with the Slack API, and respond to user actions. To develop your Slack app, follow the below steps:
Choose a language and a development environment:
Slack supports many programming languages, including Python, Node.js, Ruby, and Java. You can use any text editor or IDE for development, but some popular choices are Visual Studio Code, Atom, and Sublime Text.
Install the Slack SDK for your chosen language:
The SDK provides libraries and tools to make it easier to develop Slack apps. You can find instructions for installing the SDK for your language in the Slack API documentation.
Overview of the suite of assistance available to app builders:
Bolt:
A foundational framework for Slack apps:
Available in JavaScript, Python, and Java.
Handles foundational setup so you can focus on your app's functionality.
Includes a basic web server, authentication and installation handling, simplified interfaces for all Slack APIs and app features, automatic token validation, retry, and rate-limiting logic.
Built-in type support for more productivity.
Workflow Builder:
Automate tasks in Slack without writing code.
Can initiate a workflow from an external service using a webhook.
Other development tools:
Block Kit Builder: a visual prototyping tool for surfaces.
Steno: a sidekick for developing tests for your Slack app.
Slack Developer Tools: helps you build Slack apps.
OpenAPI specs: schemas and specifications for Slack platform features, all documented in open formats.
Slack SDKs:
Official SDKs available for Python, Node, and Java.
Provides in-language wrappers for commonly used parts of the Slack platform.
Helps cut down on boilerplate code.
Community-developed libraries available for other languages.
Write the code
Here are some examples of things you can do with a Slack app:
Send messages to channels or users
Respond to messages with custom replies
Listen for reactions to messages and take action
Create custom slash commands
Interact with external APIs
The possibilities are endless, and you're only limited by your imagination and the capabilities of the Slack API.
In order to build our app, we've decided to use the Bolt framework for JavaScript, which we've implemented in an Express app. We're excited to share the code we've developed so far:
const { App, ExpressReceiver } = require("@slack/bolt");

const dotenv = require("dotenv");

dotenv.config();

const databaseData = {};

const database = {

  set: async (key, data) => {

    databaseData[key] = data;

  },

  get: async (key) => {

    return databaseData[key];

  },

};

const receiver = new ExpressReceiver({

  signingSecret: process.env.SLACK_SIGNING_SECRET,

  clientId: process.env.SLACK_CLIENT_ID,

  clientSecret: process.env.SLACK_CLIENT_SECRET,

  stateSecret: "my-state-secret",

  scopes: [

    "channels:manage",

    "channels:read",

    "chat:write",

    "commands",

    "incoming-webhook",

    "groups:read",

    "reactions:read",

  ],

  installationStore: {

    storeInstallation: async (installation) => {

      // change the line below so it saves to your database

      if (

        installation.isEnterpriseInstall &&

        installation.enterprise !== undefined

      ) {

        // support for org wide app installation

        return await database.set(installation.enterprise.id, installation);

      }

      if (installation.team !== undefined) {

        // single team app installation

        return await database.set(installation.team.id, installation);

      }

      throw new Error("Failed saving installation data to installationStore");

    },

    fetchInstallation: async (installQuery) => {

      // change the line below so it fetches from your database

      if (

        installQuery.isEnterpriseInstall &&

        installQuery.enterpriseId !== undefined

      ) {

        // org wide app installation lookup

        return await database.get(installQuery.enterpriseId);

      }

      if (installQuery.teamId !== undefined) {

        // single team app installation lookup

        return await database.get(installQuery.teamId);

      }

      throw new Error("Failed fetching installation");

    },

    deleteInstallation: async (installQuery) => {

      // change the line below so it deletes from your database

      if (

        installQuery.isEnterpriseInstall &&

        installQuery.enterpriseId !== undefined

      ) {

        // org wide app installation deletion

        return await database.delete(installQuery.enterpriseId);

      }

      if (installQuery.teamId !== undefined) {

        // single team app installation deletion

        return await database.delete(installQuery.teamId);

      }

      throw new Error("Failed to delete installation");

    },

  },

  redirectUri:

    "https://a66e-2401-4900-1c5c-d73-98d6-8a8a-2aa1-2fb8.in.ngrok.io/slack/oauth_redirect",

  installerOptions: {

    redirectUriPath: "/slack/oauth_redirect",

    // If this is true, /slack/install redirects installers to the Slack authorize URL

    // without rendering the web page with "Add to Slack" button.

    // This flag is available in @slack/bolt v3.7 or higher

    directInstall: true,

  },

});

const app = new App({ receiver });

app.event("member_joined_channel", async ({ event, client, say }) => {

  try {

    // Call chat.postMessage with the built-in client

    const welcomeChannelId = event.channel;

    const result = await client.chat.postMessage({

      channel: welcomeChannelId,

      text: `Welcome to the team, <@${event.user}>! 🎉 You can introduce yourself in this channel.`,

    });

    console.log(result);

  } catch (error) {

    console.error(error);

  }

});

app.message("Hello", async ({ message, say }) => {

  try {

    await say({

      blocks: [

        {

          type: "section",

          text: {

            type: "mrkdwn",

            text: `Hey there <@${message.user}>!`,

          },

          accessory: {

            type: "button",

            text: {

              type: "plain_text",

              text: "Click Me",

            },

            action_id: "button_click",

          },

        },

      ],

      text: `Hey there <@${message.user}>!`,

    });

  } catch (error) {

    console.error(error);

  }

});

app.action("button_click", async ({ body, ack, say }) => {

  // Acknowledge the action

  await ack();

  await say(`<@${body.user.id}> clicked the button`);

});

app.message("knock knock", async ({ message, say }) => {

  await say(`_Who's there?_`);

});

app.command("/echo", async ({ command, ack, respond }) => {

  // Acknowledge command request

  await ack();

  console.log(command);

  await respond(`${command.text}`);

});

app.event("reaction_added", async ({ event, say }) => {

  let date = new Date();

  let dateString = new Date(date.getTime() - date.getTimezoneOffset() * 60000)

    .toISOString()

    .split("T")[0];

  if (event.reaction === "calendar") {

    await say({

      blocks: [

        {

          type: "section",

          text: {

            type: "mrkdwn",

            text: "Pick a date for me to remind you",

          },

          accessory: {

            type: "datepicker",

            action_id: "datepicker_remind",

            initial_date: dateString,

            placeholder: {

              type: "plain_text",

              text: "Select a date",

            },

          },

        },

      ],

      text: "Pick a date for me to remind you",

    });

  }

});

app.action("datepicker_remind", async ({ body, ack, say }) => {

  // Acknowledge the action

  await ack();

  await say(

    `<@${body.user.id}> picked a date: ${body.actions[0].selected_date}`

  );

});

const startApp = async () => {

  await app.start(3000);

  console.log("⚡️ Bolt app started");

};

startApp();
Check out the full code here: Techwondoe/slack-app-poc (github.com)
Step 4: Test Your Slack App
As you develop your Slack app, it's essential to test it thoroughly to ensure it works as expected. You don't want to release a buggy app that crashes or misbehaves on Slack. Slack provides several ways to test your app, including:
The Slack API Tester
The Slack Events API Tester
These tools help you simulate user actions, send test events, and see how your app looks and behaves in the Slack workspace. It's a good idea to test your app in different scenarios, such as when a user installs your app for the first time, when your app receives events from Slack, and when your app responds to user actions.
Step 5: Submitting the app for review
When you're done with the preparation of your app, and have gone through the submission checklist, you're ready to send your app for review.
Go to your app's settings dashboard.
Click into the Submit to App Directory page.
Complete the checklist and click the Preview Submission button.
Wait for Slack to review your app and either approve it for listing or request revisions.
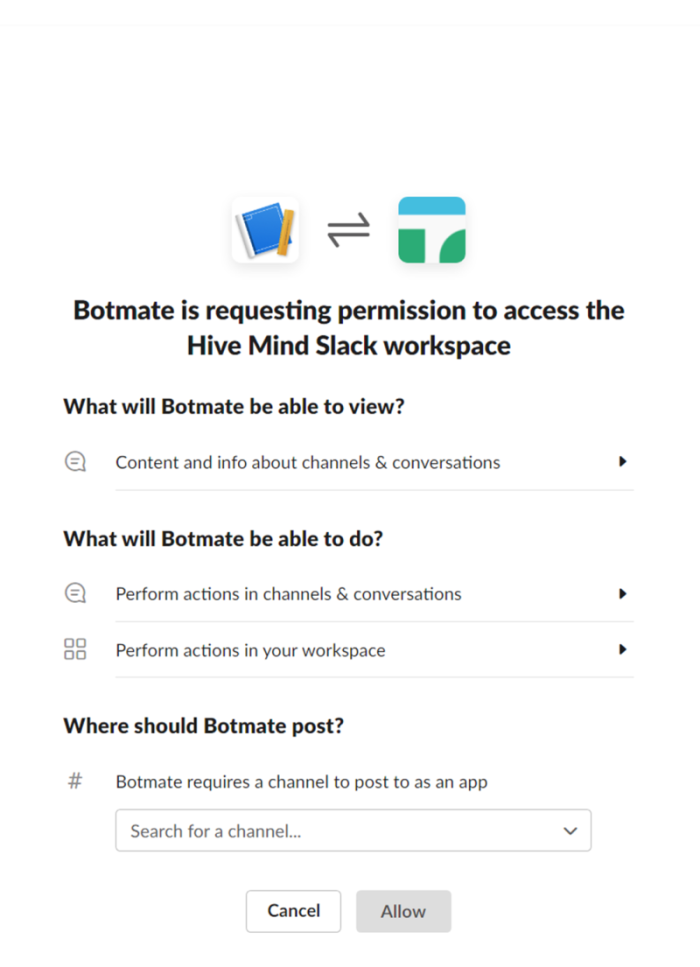
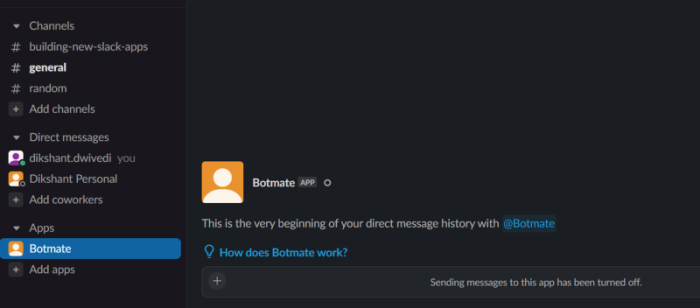
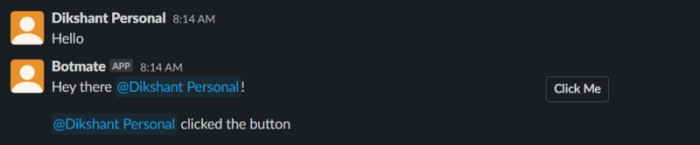
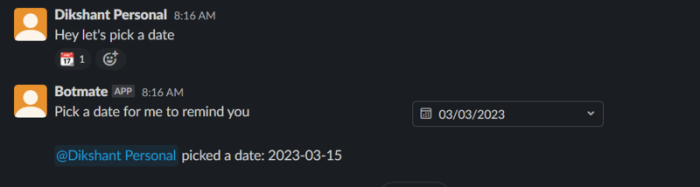
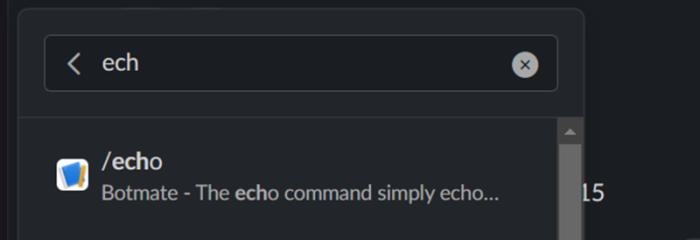
Here’s our final app
Installation

-
"Member_joined_channel" event

-
Messaging “Hello” and clicking the interactive button
-
Messaging “knock knock”


Reacting to a message with date picker and picking a date
Using the echo command


Conclusion
Creating your own Slack app can be a great way to add functionality and value to the Slack platform. By following the steps outlined in this guide, you can create and launch your own app in a matter of days.
Remember to keep your app simple, focused, and user-friendly, and to test it thoroughly before launching it. By doing so, you can ensure that your app meets the needs of your users and is a valuable addition to the Slack ecosystem.
References
Complete code link: Techwondoe/slack-app-poc (github.com)